|
|
CHAPTER 1
A craftsman is only as good as his tools. The programs you'll need for
this project are:
- A 3D Modeling Program
- A Bitmap Editing Program
- A Ride Editor Program
- A few other downloadable sundry items
Let's discuss particulars --
3D MODELING PROGRAM - 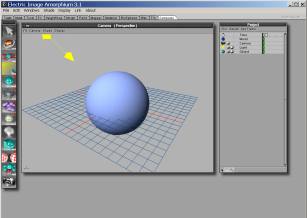 This could be any 3D modeler. Personally, I use Amorphium 3.0. from Electric Image. There are many others on the market and ANY of them will work (or should). This could be any 3D modeler. Personally, I use Amorphium 3.0. from Electric Image. There are many others on the market and ANY of them will work (or should).
It IS possible to create a ride with a simple Paint program, but you're in for a LOT of pixel-pushing.
If you're serious about making rides, get a 3D program.
You can find links to suitable (mostly FREE) programs HERE in the RCT Space Network Forums. Do NOT ask for my opinion about the ease of use or suitability
of any particular program you may find there. I've ONLY used Amorphium.
One thing to look for that will make life MUCH easier is to be certain your 3D program can output your
project as an ANIMATED .GIF MOVIE. Trust me...it's essential. I wouldn't do a ride without it.
BITMAP EDITING PROGRAM - I use Corel PhotoPAINT for my projects, but it's just 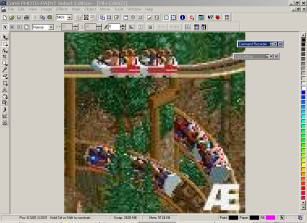 a personal preference. Any PhotoShop-type art program will do the job. The more advanced, the better. Filters, masks and the
ability to batch-edit images using scripts will definitely come in handy. MS Paint WILL NOT cut it. a personal preference. Any PhotoShop-type art program will do the job. The more advanced, the better. Filters, masks and the
ability to batch-edit images using scripts will definitely come in handy. MS Paint WILL NOT cut it.
Make sure that your Bitmap Editor is capable of extracting/applying a CUSTOM 256-color
palette...a certain set of colors used in an image. RCT2 uses an extremely specific set of colors. If your images are not
converted to THAT palette, you're in for heartache down the road.
RIDE EDITING PROGRAM for RCT2 - There are two options available...and both FREE: |
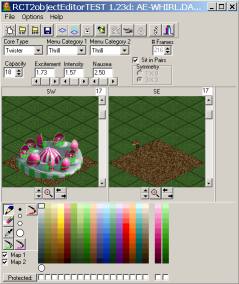
Doctor J's version of the Editor is very graphically oriented, enabling you
to see what the final project will look like.
His is also very easy to use. However, it IS a bit limited in it's capabilities.
It will only allow you to work with one type of animated ride; the Twist/Snow Cups. (They're the same ride programming...just
different artwork.)
You can download Dr J's Ride/Object Editor at his website HERE.
|
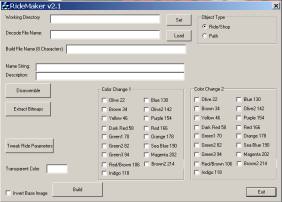 The other version was created by Buggy of Interactivites, Inc. His is NOT user-friendly...almost user-HOSTILE...and not graphically
oriented at all. That means that you won't see a THING until you finally build the ride and open it in a test scenario in
the game. The other version was created by Buggy of Interactivites, Inc. His is NOT user-friendly...almost user-HOSTILE...and not graphically
oriented at all. That means that you won't see a THING until you finally build the ride and open it in a test scenario in
the game.
However, Buggy's version is more flexible, allowing you to create rides
based on any ride in RCT2 with very few exceptions.
You can download Ride Converter 2.1 at his website HERE.
Basically, the two are like Windows and DOS (remember DOS?);
one is easier to use, but the other is more functional...IF you know how to use it. I suggest that you download BOTH...which
will help you understand things later.
EXTRA HANDY TOOLS - The other program I recommend is
the IrfanView Image 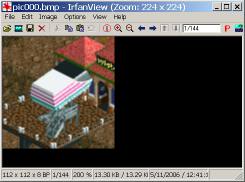 Viewer. I use Version 3.95, but newer versions will likely work just as well. It can be downloaded from http://www.irfanview.com. You may need to register, but the download is free. Viewer. I use Version 3.95, but newer versions will likely work just as well. It can be downloaded from http://www.irfanview.com. You may need to register, but the download is free.
Support them if you can -- it's great stuff. We'll discuss
what it's used for in Chapter 7.
Well, now that we've gotten our tools out, the next thing is to select a project...
|
|
CHAPTER 2
Be forewarned, Buggy and I learned (the HARD way) that making your "dream
ride" in RCT may be impossible. The underlying programming cannot be changed without crashing the game.
The ONLY thing we can do is re-skin the ride...change the artwork. That’s it. End of story. We
choose an existing ride in RCT2 to use as a base (our "Base Ride"), rip it apart, insert our own artwork and animations, then
re-assemble the thing and hope for the best.
Certain things about the rides are "hardcoded," meaning that they cannot be changed. The hardcoded
information may be incorporated into the programming of:
The individual ride's .dat file - the file that contains individual ride information and artwork
The g1.dat file - a huge file where the graphics for many of the game's elements (tracks, supports,
etc.) are stored
The game's main .exe file - rct2.exe program, which runs the game itself
Life WOULD be so much easier if these things could be altered, but wishing ain't gonna make it happen.
Keep in mind that many things in RCT are simply not possible. Sadly, your dream ride may never
become a reality...but with a little creativity, you might come close.
The best thing to do is keep your ideas flexible and change them to fit the game's requirements.
|
|
HOW TO DISSECT A RIDE
Let's rip open an RCT2 Ride and look at it’s guts.
For safety's sake, create a folder on your computer JUST for your RCT RideMaking projects...we'll call
it "RideFolder." Create a subfolder inside that one called "cups." Then navigate to:
c:\ProgramFiles\InfogramesInteractive\RollerCoasterTycoon2\ObjData
-- or if you are playing the "Triple Thrill Pack", the folder --
c:\Program Files\Atari\RollerCoaster Tycoon 2 Triple Thrill Pack\ObjData\
Locate the file twist2.dat. Copy it to your clipboard and paste a copy into your "cups"
folder.
 Fire up Buggy's RideMaker and click the "SET" button. Go to your "cups" folder and double-click on the twist2.dat file. This
tells the program where to put everything it’s going to generate. Fire up Buggy's RideMaker and click the "SET" button. Go to your "cups" folder and double-click on the twist2.dat file. This
tells the program where to put everything it’s going to generate.
Click the "LOAD" button and again, go to the "cups" folder and double-click on the twist2.dat
file. This tells it what .dat file you want to rip apart.
Click "Disassemble," and when finished (could take a few seconds), click "OK."
Click "Extract Bitmaps," and when finished (could take even longer), click "OK."
NOTE: When using Buggy's RideMaker, some processes...especially extracting bitmaps...can take
a while, up to a minute or more in the case of some rollercoasters and tracked rides. During this time, you may think
that your PC has stopped responding or locked up, but DON'T INTERRUPT THE PROCESS! Just be patient and watch the little
hard drive light blink on your computer. Everything will be fine.
|
|
Inside the "Snow Cups"
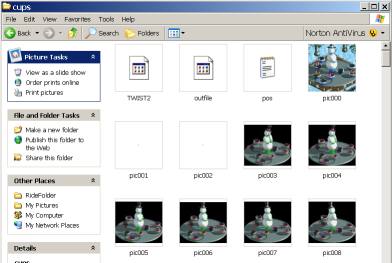
Close the RideMaker...it's a distraction...and open your "cups" folder. It's now FULL of stuff!
Snow Cup Ride Guts! If using Windows XP, click view/thumbnails to make things easier to comprehend.
Let's identify the "organs":
twist2.dat - The original ride's .dat file...containing a compressed version of everything you
see here.
outfile.bin - Nothing you need to concern yourself with...DON'T DELETE IT!
pos.txt - We'll get to that in a minute
A whole BUNCH of .bmp files - All 243 images necessary to create the Snow Cups ride in the game
Let's look at the pretty pictures now:
pic000.bmp - Look familiar? It's the image you see in the Ride Selection window in the game.
The fancy little scalloped edges are added during game-play as needed.
pic001 & 002.bmp - Tiny little one-pixel .bmp images...dark green, for some reason. I personally
have no idea what they're used for, but the game does! Don't mess with them or RCT2 will slap your fingers. You've been warned.
pic003-026.bmp - The 24 animation frames that make the ride go round and round. You'll notice
that they're not all exactly the same size. We'll get to that in a minute. Try selecting all 24 of them in Windows, then right-click
on one and select "Preview." Press your keyboard's Right Arrow key and you'll see a repeating slideshow that displays the
animation sequence. Kinda cool.
pic027-242.bmp - The 216 images that show the happy, little riders going round and round. Doing
the slideshow trick doesn't show much...just pairs of riders spinning and occasionally disappearing.
Why 216? (9 cars full of RCT Riders) x (24 ride animation frames) = 216 images needed to show the riders.
You'll notice that they're not all the same size either. Let's explain this mystery now.
When the game opens a ride, it uses 2D Geometry to figure out where to place the ride. On the X,Y plane
of the screen, 0,0 is the center of the base of the ride...the exact middle of the brown dirt-looking tiles that appear when
you build it. All the images are placed individually.
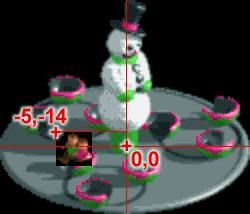 They're each offset by a particular number on the X and Y axis. Open the pos.txt file. How many images did we have total INCLUDING
pic000.bmp? 243. You'll find 243 sets of numbers -- X,Y coordinates actually -- nestled in the pos.txt file. They're each offset by a particular number on the X and Y axis. Open the pos.txt file. How many images did we have total INCLUDING
pic000.bmp? 243. You'll find 243 sets of numbers -- X,Y coordinates actually -- nestled in the pos.txt file.
To keep the size of the file small, every RCT2 image is cropped as closely as possible. To make sure
that they all get put in the right position...every little rider in the correct seat...the game consults the proper line in
the pos.txt file and adjusts the image’s placement accordingly.
I use a little shortcut to avoid a MASSIVE amount of figuring and testing for the pos.txt...but we’ll
cover that in Chapter 8 when we get there.
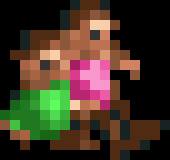 The riders board this ride in pairs, so the rider images show both Riders...one in a pink shirt and one in green. During the
game, the pink or green are replaced with whatever color that park guest happens to be wearing. The riders board this ride in pairs, so the rider images show both Riders...one in a pink shirt and one in green. During the
game, the pink or green are replaced with whatever color that park guest happens to be wearing.
Next time you play the game, look carefully. If the guests ride a certain ride in pairs, only their
shirts will change color...their pants will all be brown. When they get off the ride, their pants become their original color
again. Never noticed that before, did you?
By the way, the Snow Cups spins, but doesn’t rotate.
(What did he say?)
There is only one view of the Snow Cups. Because it would really look the same from any angle, it doesn’t
rotate with the game map when you’re playing. The game doesn’t discern between looking at it from the South and
looking from the North...it’s always the same animation sequence.
So, what have we learned?
- The game draws the ride itself separately from the riders
- Some flat rides have only one view
- Pink and green are color-changeable during the game
- Some rides will make the guests have to change their pants
|
|
Studying U.F.O.'s
Intrigued? Cool! Let’s try another one. Make another subfolder in your RideFolder...let’s
call this one "saucers." Go back to your RCT2 installation, find the file fsauc.dat and put a copy of it into
your new "saucers" folder.
Re-open Buggy’s RideMaker and rip the fsauc.dat apart...SET button first, LOAD
button next, DISASSEMBLE and EXTRACT BITMAPS. Now look inside your "saucers" folder...
FLYING SAUCER RIDE GUTS!
You’ll see some file names you recognize from the our previous exercise and by now, should understand
what some of them are.
Notice that there are 32 pictures of the ride’s car...the saucer. Do the slideshow trick and
you’ll see that it simply spins around. Those 32 animation frames make it...well...spin around. Since the ride’s
car moves randomly in any direction, it needs all those pictures to show the ride.
How far does the saucer turn from one image to the other? (WOW! MORE Math...)
(360 degrees in a full circle) / (32 animation frames) = 11.25 degrees
That becomes important when you’re doing the animation later.
Notice the color of the saucer, too...pink and green like the rider’s shirts earlier. Those two
colors will become paintable in the game.
You’ll also find 32 images of the rider...rotating the same number of degrees from image to image.
You’ll also notice that sometimes you can’t see his legs! RCT cut his legs off!
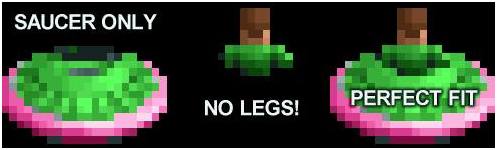
Not really. But the Ride image is always put onto the screen first...the Rider is layered on afterward.
The parts of the Rider that don’t show when he’s sitting in the vehicle are simply not there...otherwise he’d
appear to be "ON" the vehicle, not "IN" it.
One thing that you DON’T see in those images is the weird hoverboard base that the saucers float
on in the game. Remember the hardcoded (UNCHANGEABLE) items we discussed earlier? That’s one of them. Those images
-- like ALL of the tracks in RCT2 -- are contained in the g1.dat file...which we can’t edit. Too bad. So sad.
Have a nice day.
So, what have we learned from this one?
- Paintable parts of rides are also colored pink and green
- Rider images are usually incomplete because they’d overlap the ride image
- Some things just can’t be changed.
|
|
Anatomy of a Tracked Ride
Okay...can you stand one more?
Make another subfolder in your RideFolder and name it "racer." Go back to your RCT installation’s
objData folder, find rcr.dat, and put a copy of it into your new folder. Open Buggy’s RideMaker and rip
that .dat file apart like the others. Then peek into the "racer" folder
WOW! LOTS of guts in that one.
If this were a classroom, I’d ask you to identify what each file is...but I guess I’ll
just have to trust you on this one.
Okay, we have 104 images of the car. WHY SO MANY?! Do the slideshow trick to see what we’re
doing and I’ll break them down:
The first 32 frames are of the car on a flat surface...a 32-frame rotating animation. (11.25
degrees, right? Yeah...you knew that.) This allows the vehicle to appear to turn smoothly on curved sections of track.
The next four are of the car facing the four corners - NorthEast, SouthEast, SouthWest and NorthWest.
You’ll also notice that the car is tilted upward JUST slightly...about 11.25 degrees from level. These images are used
when the vehicle is JUST starting to go up an incline.
The next four are exactly the same, but with the car tipped DOWN 11.25 degrees. That’s
for when it comes OFF a slope.
Why don’t we need 32 images there? Because in RCT2, there are only four directions in
which you can build an inclined track for this ride...that’s why, smart guy.
The next 32 images are another 32-frame rotation...and the car is tipped upward just a bit more...to
about 22.5 degrees. That’s half of a 45-degree angle...and the same slope as the steepest track available on this ride.
The next 32 images are identical to the previous ones, but with the car pointed DOWN 22.5 degrees...for
just the reasons you’d figure.
Why don’t we need only 4 images, since slopes can only go in 4 different directions? Because...because...well,
I don’t KNOW why we need all those images. I’m not really convinced that the game uses them all. I believe that
in some of my own tracked ride projects, I left them blank and nobody noticed. Maybe they get used during vehicle crashes,
but I can’t be sure. They are there because...well...Chris Sawyer says so, okay?
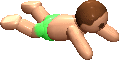
Next, the rider images...a cute little guy in a green shirt (as you’d expect),
with 104 frames (just as you’d expect) rotated in exactly the same positions as the car images (just as you’d
expect)...with his little legs cut off (just as...never mind).
What you might NOT expect is the images that come next...pic211-242.bmp. They’re
single-pixel and ALL BLACK! Think of them as 32 blank frames of animation.
Why are they there? I don’t know.
Are they important? Possibly.
Can you delete them? Absolutely not.
I suspect that they’re an artifact left over from when the game was still being developed...a
different animation method was used, perhaps...or these might have been an abandoned loading sequence (which are usually placed
at the end).
They’re there because they’re there. Who knows? Chris Sawyer does, but he’s not talking.
So, what have we learned?
- Rides with hills on their tracks have MANY more images than those without
- Sometimes in RCT2, things just are what they are and make no sense.
- You ignore that silliness at your peril.
Further Exploration
From here we could go on to opening various flat rides and coasters, but we won’t. Feel
free to explore them on your own and study their similarities and differences.
You should notice that Flat rides all have the same basic format...with certain little anomalies here
and there. Coasters all have the same format as well, but with extra features for each one.
For instance, certain coasters CAN do diagonal sections of track, so they have EIGHT slightly sloped
images instead of four. Some have an extra image for a nose-cone, end section, connecting segment or even a totally separate
vehicle image for the front or rear car of the train. Be warned though, loops and corkscrews get into some pretty crazy geometry
just to figure out which way to point the car!
But if you’re trying to figure out a coaster, just remember that coasters are like people...some
may behave differently than others, but they’re all basically the same.
Flat rides are each different, too. Some, like the Snow Cups we looked at, have only one view and don’t
actually turn when you rotate the map in the game. Others may have two views or even four. Some have HUNDREDS of rider images.
Some have none at all.
Again, there are some differences, but they’re all basically the same.
|
|
CHAPTER 3
Since we are unable to program a new Ride completely from scratch,
our projects must be based on an existing Ride in RCT2. This will become our "Base Ride."
Listed below are all of the animated rides available. You'll find information
about the size of each, the capacity, Rider status (visible or not), hard coded items, the number of animation frames you'll
need to create and any special notes about that particular ride that may help or hinder your efforts to edit it. |
The Ride Table
| Ride Name (.dat File) |
Capacity |
Size |
Hard coded items |
Riders |
Animation Frames
(Ride/Riders) |
Notes: |
| Air Powered Coaster (thcar.dat) |
2 Riders per car |
Tracked |
Track & Stations |
Visible |
1,164
(774/390) |
Separate image for front train's "nose-cone."
This is added to the front vehicle of each train during game-play |
| American Style Steam Trains (aml1.dat) |
6 Riders per car |
Tracked |
Track & Stations |
Visible |
1,152
(768/384) |
Smoke from engine and it’s placement
and the sound effects are hardcoded |
| Articulated Wooden Coaster Trains (mft.dat) |
4 Riders per car |
Tracked |
Track & Stations |
Visible |
2,880
(1,440/1,440) |
None..it’s pretty standard for
a coaster |
| Automobile Cars (wcatc.dat) |
4 Riders per car |
Tracked |
Track & Stations |
Visible |
1,812
(604/1,208) |
None |
Bobsled Coaster
(bob1.dat) |
2 Riders per car |
Tracked |
Track & Stations |
Visible |
2,704
(1,352/1,352) |
Due to the beautiful (and extremely
complex) swinging motion on curves, this ride requires FIVE images for every position. The flat image is first, then banked
halfway to the Rider’s right, then the left. The next is FULLY banked to the right, then FULLY banked to the left |
Bumper Boats
(bboat.dat) |
2 Riders per car |
Various |
Dock (Station) |
Visible |
64
(32/32) |
Water only...no animation. Similar to
the Flying Saucers |
Canoes
(cboat.dat) |
2 Riders per car |
Various |
Dock (Station) |
Visible |
112
(16/96) |
Water only, Animated Riders paddle as
the boat moves. Uses a 16-frame rotation. |
Charlift Cars
(clift1.dat) |
2 Riders Per Car |
Tracked |
Cables, Supports & Stations |
Visible |
88
(44/44) |
None |
Cheshire Cats Cars
(ctcar.dat) |
2 Riders per car |
Tracked |
Track & Station |
Visible |
208
(104/104) |
None...just a straight forward tracked
ride with gentle inclines |
Coaster Boats
(cstboat.dat) |
4 Riders per car |
Tracked |
Track& Station |
Visible |
1,728
(432/1,294) |
Water Splashes not editable...can’t
be removed |
Compact Inverted Coaster
(slct.dat) |
2 Riders per car |
Tracked |
Track & Station |
Visible |
1,360
(680/680) |
Separate image for front car's "nose-cone" |
Corkscrew Coaster
(arrt1.dat) |
4 Riders per car |
Tracked |
Track & Station |
Visible |
4,468
(1,908/2,560) |
Separate image for "joint" between cars |
Dinghy Slide
(ding1.dat) |
2 Riders per car |
Tracked |
Track & Station |
Visible |
2,576
(1,288/1,288) |
Due to the beautiful (and extremely
complex) sliding motion on curves, this ride requires FIVE images for every position. The flat image is first, then banked
halfway to the Rider’s right, then the left. The next is FULLY banked to the right, then FULLY banked to the left. |
Dodgems Cars
(dodg1.dat) |
1 Rider per car |
4 x 4 |
Floor, Walls & Roof |
Visible |
128
(64/64) |
Cars headlights and tail lights are
animated! Movement is random and cannot be controlled |
Double Deck Observation Tower
(obs1.dat) |
32 |
3 x 3 |
Tower |
Not Shown |
36
(36/0) |
8 frames rotate car 22.5 degrees. Far
side of roof is included as a separate animation...MAKE SURE THEY MATCH UP! |
Elevator
(lift1.dat) |
16 |
3 x 3 |
Support structure |
Visible |
148
(16/132) |
Complex Rider placement inside car.
Single image rises and falls...no animation sequence to speak of |
Enterprise
(enterp.dat) |
16 |
4 x 4 |
Nothing |
Only shown when loading |
244
(196/48) |
Very complex (and FAST!) animation sequence.
Animated gates close, four frame sequence for first few rotations, speed increases and animation goes to a 3 frame sequence.
Four unique views. |
Ferris Wheel
(fwh1.dat) |
32 |
1 x 4 |
Side supports |
Visible |
544
(32/512) |
8 Frames of ride animation in each view to rotate wheel 1/16th
of a turn. |
Floorless Coaster
(bmfl.dat) |
4 Riders per car |
Tracked |
Track & Station |
Visible |
2,520
(840/1,680) |
None...a straightforward coaster |
Flying Coaster
(bmair.dat) |
4 Riders per car |
Tracked |
Track & Station |
Visible |
4,560
(1,520/3,040) |
None |
Flying Saucers
(fsauc.dat) |
1 Rider per car |
4 x 4 |
Floor |
Visible |
64
(32/32) |
Random movement. Floor cannot
be altered |
Flying Turns Coaster
(intbob.dat) |
6 Riders per car |
Tracked |
Track & Station |
Visible |
5,408
(1,352/4,056) |
Due to the beautiful (and extremely
complex) swinging motion on curves, this ride requires FIVE images for every position. The flat image is first, then banked
halfway to the Rider’s right, then the left. The next is FULLY banked to the right, then FULLY banked to the left...same
goes for the rider images. |
Ghost Train Cars
(gtc.dat) |
2 Riders per car |
Tracked |
Track & Station |
Visible |
240
(104/104) |
32 BLANK animation frames at the end...just
to be silly |
Giga Coaster
(intst.dat) |
4 Riders per car |
Tracked |
Track & Station |
Visible |
3,624
(1,208/2,416) |
None |
Go Karts
(kart1.dat) |
1 Rider per car |
Tracked |
Track & Station |
Visible |
208
(104/104) |
Motor sound effects are hardcoded and
cannot be removed or changed |
Haunted House
(hhbuild.dat) |
15 |
3 x 3 |
Nothing |
Not visible |
76
(76/0) |
An 18 frame intermittent animation (ghost
at window) may be changed, but it is synchronized with a hardcoded sound. |
Haunted Mansion Car
(hmcar.dat) |
2 Riders per car |
Tracked |
Track & Stations |
Visible |
240
(104/104) |
32 BLANK animation frames at the end...but
WHY??? |
Hedge Maze
(hmaze.dat) |
Up to 16 |
Variable |
Nothing editable |
Visible |
0 |
No images contained in dat file...the
entire ride is hardcoded. Sorryd |
Hyper Twister Coaster - Wide Trains
(bmrb.dat) |
4 Riders per car |
Tracked |
Track & Station |
Visible |
2,868
(1,426/1,442) |
Separate image for front car's "nose-cone" |
Hyper Coaster
(arrt2.dat) |
6 Riders per car |
Tracked |
Track & Station |
Visible |
3,552
(2,666/886) |
None |
Hyper Twister Coaster
(goltr.dat) |
6 Riders per car |
Tracked |
Track & Station |
Visible |
3,588
(1,440/2,148) |
Separate image for last car's rear bumper |
Inverted Coaster
(nemt.dat) |
4 Riders per car |
Tracked |
Track & Station |
Visible |
2,520
(840/1,680) |
None |
Inverted Hairpin Coaster
(ivmc1.dat) |
4 Riders per car |
Tracked |
Track & Station |
Visible |
590
(196/394) |
None |
Inverted Impulse Coaster
(intinv.dat) |
4 Riders per car |
Tracked |
Track & Station |
Visible |
936
(312/624) |
None |
Inverted Shuttle Coaster
(slcfo.dat) |
4 Riders per car |
Tracked |
Track & Station |
Visible |
2,040
(680/1,360) |
None |
Inverted Vertical Shuttle
(vekdv.dat) |
4 Riders per car |
Tracked |
Track & Station |
Visible |
2,040
(680/1,360) |
None |
Jet Skis
(jski.dat) |
1 Rider per car |
Various |
Station |
Visible |
64
(32/32) |
Only built on water...pretty standard
flat, tracked ride layout |
Ladybug Coaster Trains
(zldb.dat) |
2 Riders per car |
Tracked |
Track & Station |
Visible |
1,488
(728/728) |
Front car different from the others.
32 spare animation frames at the end. <Sigh> |
Launched Freefall
(ssc1.dat) |
8 |
3 x 3 |
Tower |
Visible |
21
(9/12) |
Single image moves vertically...not
truly animated. Includes 3 frame guest restraint animations. Probably one of the simplest tracked rides to customize |
Lay-Down Coaster
(vekst.dat) |
4 Riders per car |
Tracked |
Track & Station |
Visible |
4,080
(1,360/2,720) |
None |
LIM Coaster
(premt1.dat) |
4 Riders per car |
Tracked |
Track & Station |
Visible |
5,040
(1,680/3,360) |
Front car different from the others. Includes Guest Restraint
animations |
Log Flume
(lfb1.dat) |
2 Riders per car |
Tracked |
Track & Station |
Visible |
624
(208/416) |
None |
Log Coaster Trains
(zlog.dat) |
2 Riders per car |
Tracked |
Track & Station |
Visible |
1,488
(728/728) |
Front car different from the others.
32 spare animation frames of unknown usefulness at the end |
Looping Coaster Trains
(scht1.dat) |
4 Riders per car |
Tracked |
Track & Stations |
Visible |
4,320
(1,440/2,880) |
None |
Magic Carpet
(mcarpet1.dat) |
12 |
1 x 4 |
Four corner supports |
Visible |
28
(4/24) |
Four corner supports and swing-arms
are not removable...and lining up your artwork with those swing arms can be a real job. Four unique views. |
Merry Go Round
(mgr1.dat) |
16 |
3 x 3 |
None |
Visible |
100
(32/68) |
Riders shown ONLY on one side of Ride.
Music is not changeable. Ride has only one view. |
Mine Mouse Cars
(smc2.dat) |
4 Riders per car |
Tracked |
Track & Stations |
Visible |
584
(184/368) |
32 spare animation frames
at the end....inconceivable! |
Mine Train Ride
(pmt1.dat) |
2 Riders in front car, 4 in others |
Tracked |
Track & Station |
Visible |
1,820
(728/1,092) |
Front car different from the others...and
different capacity. Makes things interesting. |
Mine Train Coaster
(amt1.dat) |
2 Riders in front car, 4 in others |
Tracked |
Track & Station |
Visible |
2220
(888/1,332) |
Front car different from the others...and
different capacity. Makes things even MORE interesting. |
Mini Golf
(golf1.dat) |
Various |
Various |
Golf Holes |
Visible |
149
(0,149) |
Only Player animations are editable,
but since the holes are hard coded (and unviewable) it truly wouldn’t make much sense...I mean, how would you line everything
up? |
Mini Helicopters
(helicar.dat) |
2 Riders per car |
Tracked |
Track & Station |
Visible |
864
(416/416) |
Includes animated propeller...and the
guests bob their heads as they ride! Never noticed that before... |
Monorail Cycles
(monbk.dat) |
1 Rider per car |
Tracked |
Track & Station |
Visible |
256
(128/128) |
Includes animated cycle and Rider...their little legs move
and everything. |
Monster Trucks
(4x4.dat) |
2 Riders per car |
Tracked |
Track & Station |
Visible |
424
(196/196) |
32 spare animation frames at the end...go
figure |
Motion Simulator
(simpod.dat) |
8 |
2 x 2 |
Nothing |
Not Shown |
140
(140/0) |
Four unique views. Four frame door animation,
followed by 32 frames of movement. Movement SEEMS to be random -- haven’t really investigated it for a pattern -- and
cannot be controlled. |
Motorbike Races
(steep2.dat) |
2 Riders per car |
Tracked |
Track & Station |
Visible |
256
(128/128) |
None |
Multi Dimension Coaster
(arrx.dat) |
4 Riders per car |
Tracked |
Track & Station |
Visible |
28,224
(?? / ??) |
Didn’t count Rider vs. Ride frames,
but I’d guess it’s evenly split. Due to the ability to "program" the car’s position on any section of track,
it would be like building a complete coaster for every rider position possible. I know I won’t be building one of these,
myself. |
Observation Tower
(obs1.dat) |
20 |
3 x 3 |
Tower |
Not Shown |
36
(36/0) |
8 frames rotate car 22.5 degrees. Far
side of roof is included as a separate animation...MAKE SURE THEY MATCH UP! |
Pickup Truck Cars
(truck1.dat) |
1 Rider per car |
Tracked |
Track & Station |
Visible |
264
(116/116) |
32 spare animation frames at the end.
(Whatever...) |
Pirate Ship
(swsh1.dat) |
16 |
1 x 5 |
Triangular Support Frame |
Visible |
342
(38/304) |
Two views...repeated for map rotation |
Racing Cars
(rcr.dat) |
1 Rider per car |
Tracked |
Track & Station |
Visible |
240
(104/104) |
Amazingly, there are 32 spare animation
frames at the end |
Retro Monorail
(mono3.dat) |
4 Riders per car |
Tracked |
Track & Station |
Visible |
1,152
(384/768) |
Front car different from the rest of the train. |
Reverse Freefall
(revf1.dat) |
8 Riders per car |
Tracked |
Track & Station |
Visible |
1,560
(312/1,248) |
None |
Reversing Coaster
(revcar.dat) |
6 Riders per car |
Tracked |
Track & Station |
Visible |
936
(312/624)/ |
Sliding Spin Slate is animated separately |
River Rafts
(rftboat.dat) |
4 Riders per car |
Tracked |
Track (water) & Station |
Visible |
96
(32/64) |
None |
River Rapids Boats
(rapboat.dat) |
8 Riders per car |
Tracked |
Track (water) & Station |
Visible |
360
(72/288) |
8 frames animate boat turning 90-degrees.
Water splashes are hardcoded |
Rocket Coaster Cars
(rckc.dat) |
4 Riders per car |
Tracked |
Track & Station |
Visible |
1,776
(592/1,184) |
None |
Roto-Drop
(gdrop1.dat) |
16 |
3 x 3 |
Tower |
Visible |
148
(19/129) |
4 frame animation rotates car 22.5 degrees.
Animated Restraints, too...thus the odd number of frames |
Rowing Boats
(rboat.dat) |
2 Riders per car |
Various |
Station (dock) |
Visible |
128
(16/112) |
Water only, Animated Riders paddle as the boat moves |
Side-Friction Coaster Cars
(sfric1.dat) |
4 Riders per car |
Tracked |
Track & Station |
Visible |
624
(208/416) |
None |
Ski-Lift Cars
(clift1.dat) |
2 Riders Per Car |
Tracked |
Cables, Supports & Stations |
Visible |
88
(44/44) |
None |
Small Monorail Cars
(mono2.dat) |
4 Riders per car |
Tracked |
Track & Station |
Visible |
420
(140/280) |
None |
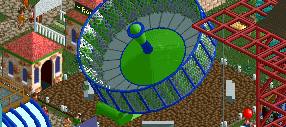
Snow Cups
(twist2.dat) |
18 |
3 x 3 |
Nothing |
Visible |
240
(24/216) |
24 Frames rotate ride 120-degrees. Riders
require ALL 216 FRAMES to reach their original starting point. |
Soap Box Derby
(sbox.dat) |
4 Riders per car |
Tracked |
Track & Station |
Visible |
384
(128/256) |
None |
Space Rings
(srings.dat) |
4 |
3 x 3 |
Animation Position |
Visible |
704
(352/352) |
Four individual animations of one rider
each. Four unique views. Animation is repeated a number of times. Sections of the animation MUST be able to run BACKWARD without
looking silly. |
Spiral Coaster Cars
(spdrcr.dat) |
6 Riders per car |
Tracked |
Track & Station |
Visible |
2,496
(624/1,872) |
None |
Spiral Slide
(hskelt.dat) |
5 |
2 x 2 |
Not Editable |
Visible |
0
(0/0) |
Nothing editable - completely hard coded.
(DARN!) |
Splash Boats
(spboat.dat) |
16 Riders per car |
Tracked |
Track & Station |
Visible |
1,688
(184/1,472) |
Splashes hard coded. 32 spare animation
frames at the end...I dunno... |
Sports Cars
(spcar.dat) |
1 Rider per car |
Tracked |
Track & Station |
Visible |
240
(104/104) |
32 spare animation frames at the end...SURPRISE! |
Stand-Up Twister Coaster
(bmsu.dat) |
4 Riders per car |
Tracked |
Track & Station |
Visible |
3,348
(1,668/1,680) |
Separate image for front car's "nose-cone" |
Stand-Up Coaster
(togst.dat) |
4 Riders per car |
Tracked |
Track & Station |
Visible |
4,468
(1,908/2,560) |
Separate image for joiner plate between cars |
Steam Trains
(nrl.dat) |
6 Riders per car |
Tracked |
Track & Station |
Visible |
1,152
(768/384) |
Separate Engine, Coal Car and Passenger
car images. Smoke/Steam placement and sound effects are hard coded. It’s like making three separate tracked rides...but
together. (Did that make sense?) |
Steam Trains w/ Covered Cars
(nrl2.dat) |
6 Riders per car |
Tracked |
Track & Station |
Visible |
1,152
(768/384) |
See note in previous entry for Steam
Trains...it all applies here, too |
Steeplechase
(steep1.dat) |
2 Riders per car |
Tracked |
Track & Station |
Visible |
256
(128/128) |
None |
Streamlined Monorail
(mono1.dat) |
10 Riders per car |
Tracked |
Track & Station |
Not Shown |
420
(420/0) |
Different images for front, center and rear cars...140 frames
each |
Submarine Ride
(submar.dat) |
4 Riders per car |
Tracked |
Track & Station |
Not Shown |
88
(88/0) |
Cars are horizontally split at the water line. Separate
images for each half. |
Suspended Flying Coaster
(skytr.dat) |
1 Rider per car |
Tracked |
Track & Station |
Visible |
1,400
(700/700) |
Due to the beautiful (and extremely
complex) swinging motion on curves, this ride requires MULTIPLE images for every position. The flat image is first, then banked
halfway to the Rider’s right, then the left. The next is FULLY banked to the right, then FULLY banked to the left...same
goes for the rider images. |
Suspended Monorail Train
(smono.dat) |
8 Riders per car |
Tracked |
Track & Station |
Visible |
700
(140/560) |
None |
Suspended Swinging Coaster Cars
(arrsw1.dat) |
4 Riders per car |
Tracked |
Track & Station |
Visible |
4,620
(1,540/3,080) |
Due to the beautiful (and extremely
complex) swinging motion on curves, this ride requires MULTIPLE images for every position. The flat image is first, then banked
halfway to the Rider’s right, then the left. The next is FULLY banked to the right, then FULLY banked to the left...same
goes for the rider images. |
Suspended Swinging Plane Cars
(arrsw2.dat) |
4 Riders per car |
Tracked |
Track & Station |
Visible |
4,620
(1,540/3,080) |
Due to the beautiful (and extremely
complex) swinging motion on curves, this ride requires MULTIPLE images for every position. The flat image is first, then banked
halfway to the Rider’s right, then the left. The next is FULLY banked to the right, then FULLY banked to the left...same
goes for the rider images.. |
Swan Boats
(swans.dat) |
4 Riders per car |
Various |
Station (Dock) |
Visible |
64
(16/48) |
Built on water only |
Swinging Coaster Cars
(batfl.dat) |
2 Riders per car |
Tracked |
Track & Station |
Visible |
1,280
(640/640) |
None |
Swinging Floorless Coaster
(vekvamp.dat) |
2 Riders per car |
Tracked |
Track & Station |
Visible |
3,080
(1,540/1,540) |
None |
Swinging Inverter Ship
(swsh2.dat) |
12 |
1 x 4 |
Base plate, platform & rear support |
Not Shown |
174
(150/24) |
Although Rider and door opening animations are included in
the .dat, they're never used in the game. |
Tobggan Cars
(jstar1.dat) |
4 Riders per car |
Tracked |
Track & Station |
Visible |
1,776
(592/1,184) |
None |
Top Spin
(topsp1.dat) |
8 |
3 x 3 |
Nothing |
Visible |
576
(268/308) |
Extremely complex and specific animation
sequence. Five separately animated sections to line up and deal with...and be careful -- they overlap in a SPECIFIC order! |
Trams
(tram1.dat) |
10 Riders per car |
Tracked |
Track & Station |
Visible |
800
(130/638) |
32 spare animation frames at the end...what
a concept! |
Twist
(twist1.dat) |
18 |
3 x 3 |
Nothing |
Visible |
240
(24/216) |
24 Frames rotate ride 120-degrees. Riders
require ALL 216 FRAMES to reach their original starting point. |
Twister Coaster Car
(bmsd.dat) |
4 Riders per car |
Tracked |
Track & Station |
Visible |
3,348
(1,666/1,682) |
None |
Twister Heartline Coaster
(utcar.dat) |
4 Riders per car |
Tracked |
Track & Station |
Visible |
2,592
(864/1,728) |
None |
Twister Heartline Coaster - Reversed
(utcarr.dat) |
4 Riders per car |
Tracked |
Track & Station |
Visible |
2,592
(864/1,728) |
None |
Vertical Drop Coaster
(bmvd.dat) |
6 Riders per car |
Tracked |
Track & Station |
Visible |
2,880
(720/2,160) |
None |
Vintage Cars
(vcr.dat) |
2 Riders per car |
Tracked |
Track & Station |
Visible |
240
(104/104) |
32 blank animation frames at the end...hee
hee hee |
Virginia Reel
(vreel.dat) |
4 Riders per car |
Tracked |
Track & Station |
Visible |
360
(72/288) |
8 frames turn the tub 90-degrees in nine different views. |
Water Tricycles
(trike.dat) |
2 Riders per car |
Various |
Station (Dock) |
Visible |
64
(32/32) |
Trike's wheels and Rider's legs are both animated. Built
on water only. |
Wild Mouse Coaster
(smc1.dat) |
4 Riders per car |
Tracked |
Track & Station |
Visible |
620
(196/392) |
32 blank animation frames at the end.
Don’t worry...be happy. |
Wild Mouse - Mouse Cars
(wmouse.dat) |
2 Riders per car |
Tracked |
Track & Station |
Visible |
1,136
(552/552) |
32 blank animation frames at the end.
YAY! |
Wild Mouse - Mine Cars
(wmine.dat) |
2 Riders per car |
Tracked |
Track & Station |
Visible |
1,136
(552/552) |
32 blank animation frames at the end.
Yeah, baby! |
Wild Mouse - Spinning Cars
(wmspin.dat) |
4 Riders per car |
Tracked |
Track & Station |
Visible |
4,608
(1,536/3,072) |
None |
Wooden Coaster Trains
(ptct1.dat) |
4 Riders per car |
Tracked |
Track & Station |
Visible |
2,160
(720/1,440) |
None |
Wooden Coaster Trains - long
(ptct2.dat) |
6 Riders per car |
Tracked |
Track & Station |
Visible |
2,880
(720/2,160) |
None |
Wooden Coaster Trains - Reversed
(ptct2r.dat) |
6 Riders per car |
Tracked |
Track & Station |
Visible |
2,880
(720/2,160) |
None |
|
What does all this stuff MEAN?!
Many things! It also gives you clues to understanding the underlying mechanics of any particular ride.
For instance, look at the Wooden Coaster Trains above. It has 2,160 total images -- 720 images for
the vehicles themselves. The Riders board it in pairs, so each rider image shows TWO guests...one wearing a green shirt and
the other pink. Because each car has TWO sets of seats, there are TWO sets of Rider images...one for the front seats and one
for the back. So, there are exactly TWICE as many rider images as there are vehicle images.
Now look at the one below it: Wooden Coaster Trains - Long. It’s got THREE rows of seats and
holds SIX Riders per car. Thus, there are THREE times as many rider images as vehicle images.
Most of the tracked rides work that way. If you divide the number of rider images by the number of
vehicle images and it DOES NOT come out evenly, it means one of two things:
- I messed up when counting the things
- There’s probably something funky like an animated loading sequence (lap bar coming down,
door closing, etc.) or an extra piece (nose cone, joint between cars) used in the ride somewhere.
These funky things are usually added toward the END of the group of images, so you know where to start
looking for them.
Ride Capacity
While it IS possible to change the capacity of a ride using Buggy’s RideMaker program, it CAN
make the ride unstable or act in peculiar ways.
 Making the ride hold FEWER guests isn’t generally a problem...the game just ignores the other sets of rider images.
If they normally ride in PAIRS and you want them to ride SOLO, be sure you make the IMAGES look like only one rider...otherwise
they’ll all become Siamese Twins when they board the thing. If you look at the images for my "Waterslide" ride,
you'll see that I did exactly that. Making the ride hold FEWER guests isn’t generally a problem...the game just ignores the other sets of rider images.
If they normally ride in PAIRS and you want them to ride SOLO, be sure you make the IMAGES look like only one rider...otherwise
they’ll all become Siamese Twins when they board the thing. If you look at the images for my "Waterslide" ride,
you'll see that I did exactly that.
However, making the ride hold MORE guests than it’s programmed for can cause problems. Let’s
look at it from the game’s point of view.
Suddenly, you’re told that there will be two more guests than normal on this ride. (WHAT?
Um...okay, I guess.)
Which rider images do I use to display them? (Gee...my programming doesn’t say.)
Where do I put these rider images on the screen IF you find them? (Um...dunno that either.
Pardon me...I need to freak out for a minute.)
RCT does NOT like to be confused...and like a person, becomes erratic an unstable when in that situation.
Play it safe and don’t tick it off. It thows tantrums like a 2-year-old kid.
Rider Visibility
Is it possible to make visible riders invisible? Absolutely! That’s easy...you just don’t
draw any rider images. You STILL will need images as placeholders, though or the game will freak out. Single-pixel, BLACK
images would do fine. (RCT2 can be picky, but is sometimes easily appeased.) The pos.txt must also include
lines for them...but the coordinates can all be 0,0.
Can you make Riders appear on a ride where they don’t normally show? Short answer:
no. Long answer: Yes, but I wouldn’t.
You can draw riders directly onto the ride image itself. But keep in mind that they will ALWAYS be
there. Their numbers won’t change if the ride is full or empty. Think of them as mannequins..."Fake Riders."
There are folks who have incorporated Fake Riders into their rides. I’ve never liked it,
myself. It’s like making a fully functional ride that isn’t FULLY functional...no better than scenery, in my humble
opinion. But it’s a personal decision. I, myself, strive for quality. (Not saying I MAKE it, but I STRIVE for it.)
 One way around the problem is showcased in my ride "Rounded-Up." It’s based on the RCT2 Enterprise, which shows riders
when loading but NOT when the ride is in motion. Riders are visible as they ENTER the ride and then doors close to cover (hide)
them. One way around the problem is showcased in my ride "Rounded-Up." It’s based on the RCT2 Enterprise, which shows riders
when loading but NOT when the ride is in motion. Riders are visible as they ENTER the ride and then doors close to cover (hide)
them.
 So, I incorporated wire mesh "doors" on my version of the ride. The riders board and stand on their places, but then the doors
hide them from view. The thing goes SO fast that you really can’t see them when it’s moving anyway. So, I incorporated wire mesh "doors" on my version of the ride. The riders board and stand on their places, but then the doors
hide them from view. The thing goes SO fast that you really can’t see them when it’s moving anyway.
See? There are generally no mesh doors on the real-life ride on which this is based, but with
just a little creative design and the thing becomes an RCT2 reality. |
|
CHAPTER 4
I'm certain you've already got a ride in mind that you'd like to make. Get a
piece of paper and WRITE DOWN the following things about your idea. (I’m serious! Writing it down helps you to focus...DO
IT! DO IT NOW!!!):
- SIZE - Not the height, but the footprint it will have. How many
tiles it would cover.
- BUILD MODE - Is it a Flat Ride or a Tracked Ride?
- MOVEMENT - Can you work with one animation mode or will different
modes be necessary? (One mode is advisable for most Base Rides)
- SIMILARITIES - Are there rides in the game that are even REMOTELY
similar to what you're planning?
- RIDERS - Would the Riders NEED to be visible?
- CAPACITY - How many Riders can ride your creation at a time?
Once you have those, you need to choose a ride whose programming will serve
as a "Base Ride" for your project. The previous chapter includes a table listing all of the rides and car/train types in RCT2.
I've included all the pertinent information you'll need to find one that fits your needs.
I’ve said it MANY times so far, and I’m sure I’ll say it again.
(Actually, I know that I will...I’m about to say it.) Your design MUST BE FLEXIBLE. Many ride concepts
simply WILL NOT WORK within the bounds of RCT2. Since we cannot change the game’s programming, WE must be what changes.
FLEXIBILITY STUDY: "The SWINGER"
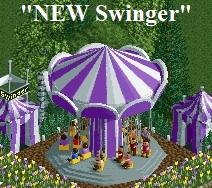 When creating The Swinger, I completely 3D modeled the ride from scratch...giving it 18 swings and Riders (9 sets of two swings
each) instead of the three dozen most real-life rides of it’s kind can hold. Since we can't increase the ride capacity...the
ride becomes very unstable when you do...I had to bend my idea to fit what the ride's programming would allow. FLEXIBLE! When creating The Swinger, I completely 3D modeled the ride from scratch...giving it 18 swings and Riders (9 sets of two swings
each) instead of the three dozen most real-life rides of it’s kind can hold. Since we can't increase the ride capacity...the
ride becomes very unstable when you do...I had to bend my idea to fit what the ride's programming would allow. FLEXIBLE!
I also noticed that the Twist/Snow Cups (their programming is identical) used
24 frames of animation to turn the ride 120-degrees...1/3 of a rotation.
Watch the ride carefully and you'll notice something else, the riders use nine
FULL rotations to return to the exact same point on the ride. This meant that the Swinger riders would NOT go 1/3 of the way
around the ride in my 24 animation frames, but 4/9 or 160-degrees.
At the end of that 24 frames, the Rider is replaced by the one that STARTS the
animation in that position at the beginning of the sequence...which is why the seats on RCT Flat Rides must all be the same
color. (If you look closely at the Swinger, you'll notice that there are 18 stripes on the purple canopy...for exactly the
same reason.)
In the original SimRide (Scenery) version, the Swinger also moved up and down...like
the real life ride does. That kind of movement would necessitate a second animation mode that kicks in after the ride starts
spinning. Because the programming of the Twist doesn't support that kind of movement -- a single animation that merely speeds
up and slows down -- the upward movement had to be sacrificed. Again, bowing to the limits of the game.
It WOULD be possible to create a Swinger that increased speed (causing the swings
to move outward) and then rose upward. The programming of the Enterprise supports something similar to that. BUT, the Enterprise
does not show Riders...it's programming doesn't allow that. The ride would have to be ALWAYS full or ALWAYS empty, making
it no better than the non-functioning SimRide version.
So, I had to make a few changes from my original idea...fewer riders, seats
not swinging outward, ride not rising upward, etc. But if I HADN’T allowed these changes, the ride would never
have become a reality in the world of RCT2.
FLAT RIDE MOVEMENT
Don’t be locked into what you see happening on the screen during the game.
The animation of any ride comes from what YOU give it during the picture-drawing process. You may look at the Twist and say,
"Can’t use that one...it spins around. I want to make something that bounces up and down." WRONG!
If you were to assemble a 24-frame animation of a ride going up and down and
plug it in to the Twist’s programming...your ride would go up and down.
However, the Twist does NOT always stop in the same position every time, so
your ride MIGHT stop to load/unload Riders while the thing is still up in the air! That’s something to consider.
 Another example is my "Ripsaw." It’s based on the RCT2 Swinging Ship which doesn’t spin...yet the Ripsaw does!
I simply made it turn in my animation sequence. The game doesn’t care...it’s just displaying the pictures. Another example is my "Ripsaw." It’s based on the RCT2 Swinging Ship which doesn’t spin...yet the Ripsaw does!
I simply made it turn in my animation sequence. The game doesn’t care...it’s just displaying the pictures.
You’ll notice that the ride doesn’t spin completely around (as I’d
hoped). The Swinging Ship uses it’s animation frames both forward AND backward, so there was no way to accomplish that
in RCT2.
 One final example is the "Chaotic" which uses the RCT2 Enterprise as a base. The cars/pods flip around in the Chaotic, but
DON’T on the Enterprise. I simply added that to my animation. One final example is the "Chaotic" which uses the RCT2 Enterprise as a base. The cars/pods flip around in the Chaotic, but
DON’T on the Enterprise. I simply added that to my animation.
One other thing about movement...SPEED! Certain rides move faster than others.
There’s really no way to really slow them down or speed them up.
However with that being said, you MAY be able to alter it SLIGHTLY via your
artwork.
Say a ride uses 16 frames of animation per revolution (most rides spin). By
making it spin only HALF that distance in those 16 frames, the ride would appear to move more slowly. Likewise, making the
animation into only eight frames (and duplicating them to complete the cycle), it would spin twice as fast.
It’s very limited...but possible depending on the ride.
FLAT RIDE LOADING AND UNLOADING
Most flat rides load and unload completely when they stop. If that’s what
YOUR ride would do, that’s wonderful. If you want to stop on individual cars and load incrementally, there’s only
one option in the game...the Ferris Wheel.
I’ve had many requests over the years for a "Zipper" or "Double Ferris
Wheel." The ONLY ride to support their incremental loading patterns is the Ferris Wheel. So far, so good...Ferris Wheel as
a Base Ride.
However, the Ferris wheel has only a FEW frames of animation (8, I think). Since
the movement of each ride requires them to turn completely around, that would make the ride turn incredibly fast...ruining
the illusion of reality we’re trying to create. There’s no way to slow it down enough with that small number of
animation frames to make it believable. That’s why I’ve never made one.
Some things in RCT2 just aren’t possible.
HARD CODED RIDE ELEMENTS
Sometimes you'll find that a ride already moves and loads like you need it to.
That's great! Although there may still be hard coded elements in the way.
Not ALL of the artwork is included in the ride's .dat file; entrance/exit buildings,
station platforms, splashes on water rides and even the support structures are generally not changeable. Hardcoded items are
listed in each ride’s entry in the previous chapter.
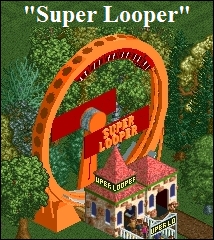 When I created the "Super Looper," I found that the Swinging Inverter Ship moved just like I needed it to. It didn't have
any programming to show Riders, but for my design, it didn't have to. When I created the "Super Looper," I found that the Swinging Inverter Ship moved just like I needed it to. It didn't have
any programming to show Riders, but for my design, it didn't have to.
The problem is, the rear support for the Inverter Ship is hard coded and NON-removable.
Since that was the ONLY ride available that moved in that fashion, all I could do is attempt to work it into the design as
best I could. (Making it look like it was holding up a ride sign helped...but I still HATE that it's there!) Hard-coded elements
are also something that you will need to take into account when choosing a ride to use as a base.
Sound effects can also be hardcoded into a ride...can’t be changed or
turned off. If they are there, you’re stuck with ’em.
CLEARANCE
One other thing to think about is the clearance of the Ride you're making. (NOTE:
If you don't know what "clearance" means then you've never made any scenery for RCT. Rides should NOT be your first project!
Go make some scenery and come back when you're comfortable with that.)
If you've created a piece of scenery, static or animated, and exceeded the clearance
limits, you've seen what happens inside the game...the top vanishes or "strobes" when something passes near it, etc. The same
thing will happen to your ride if you make it too much higher than the original Base Ride.
For example, I once attempted to make a rocket-themed Huss "Condor" ride based
on the RCT2 Double-Deck Observation Tower. The ride was modeled, fully animated and looked AWESOME!
But when I finally got to the testing phase, I found that the clearances simply
wouldn’t allow for a ride vehicle that big. As you can guess from the image, it was a sad, sad day.
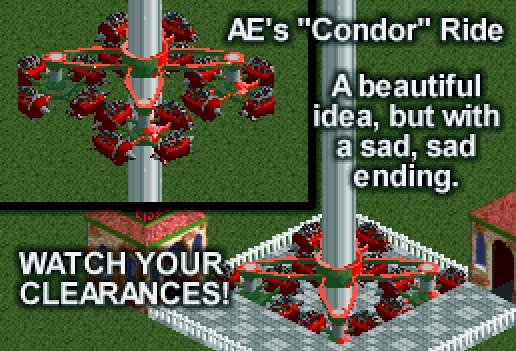
It's devastating to work long and hard on a ride only to find that it gets cut
off at the top or sides...so plan in advance and you'll save yourself from banging your head against your monitor later on.
FOOTPRINTS
The number of tiles a ride covers cannot be changed. If a base ride uses a 4
x 4 tile area (it’s "footprint"), then you can’t make it use 5 x 5 or 2 x 6. There are certain rides that I’ve
not been able to make simply because they required too much space.
If you try to extend your artwork past the horizontal boundaries prescribed
by the ride’s programming, stuff will simply get cut off and disappear. You can’t go beyond the brown tiles.
You CAN make a ride smaller...a kiddie ride for example. Nothing says that you
MUST completely fill the Base Ride’s footprint. However if you use a base ride that requires 3 x 3 tiles, it will STILL
require 3 x 3 tiles in the game...the brown tiles will fill in automatically.
Now, keeping ALL that stuff in mind...let’s get to work on your ride.
If you allow your idea to remain pliable, you just may find a way to make it work...
|
|
CHAPTER 5
Now, let’s get one thing straight. This section will simply
give you the finer points of making sure YOUR model works in the realm of RCT RideMaking. I am NOT going to teach you how
to do 3D Modeling.
Take a class someplace if you have to. Do the tutorials that are available for whatever 3D program
you’re using. I’m going to be assuming that you know your way around the tools.
Speaking of which, I’ll be using the program I’ve used for years, Amorphium...version 3 at the moment. I highly
recommend it. It’s extremely intuitive. It’s similar to working with a ball of digital clay. And it’s about
$140 bucks.
As we discussed in the "Tools" section in Chapter 1 of this little tutorial, many 3D programs are available. Links can be found in that section to suitable
programs that are downloadable, cheap and some even FREE!
Since I have no idea what program you’ve selected, I can’t relate to specific tools in
those programs. But they’re all pretty much the same. You’ll just have to interpret my instructions for your own
program.
Step one is to open an RCT2 park and take a screenshot...one with a few park guests ("Peeps") in it.
The more the merrier, I suppose. Somewhere near the center of the screenshot, place nine full-tile, square building blocks
arranged in a square as shown in the example. Make certain you can see ALL the edges of it.
Save the screenshot someplace that you can find it easily. You’ll find out what it’s for
later on.
Setting the Stage
Open your 3D program and let’s get busy.
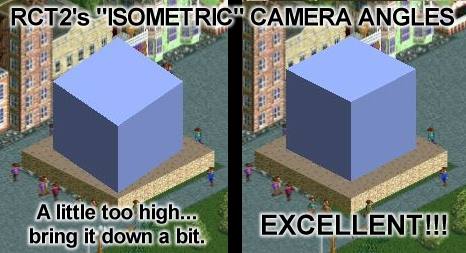
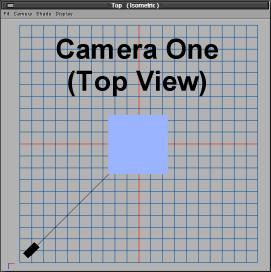 The first thing we’ll need to adjust is the camera position. RCT2 uses an "Isometric" view...but like everything else
in the game, it’s not quite a standard Isometric view. (It’s a little bit off...to keep us on our toes,
I guess) The first thing we’ll need to adjust is the camera position. RCT2 uses an "Isometric" view...but like everything else
in the game, it’s not quite a standard Isometric view. (It’s a little bit off...to keep us on our toes,
I guess)
Draw a cube in your 3D program and place it in the dead center of the stage. This will be our focal
point. The camera should NOT be facing the dead-on front of the cube. Rotate the camera so it’s looking directly at
the corner of the cube...a 45-degree angle from center. The image shows a top view of the camera position -- looking directly
down on the cube.
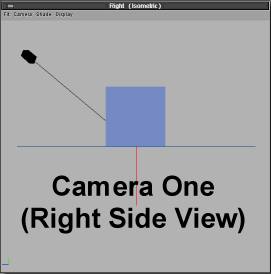 Now we need to tilt the camera DOWNWARD at a VERY specific angle. Standard Isometric View would be 30-degrees, but as I said,
RCT2 isn’t quite a TRUE Isometric view, so you’ll need to adjust it a little. Now we need to tilt the camera DOWNWARD at a VERY specific angle. Standard Isometric View would be 30-degrees, but as I said,
RCT2 isn’t quite a TRUE Isometric view, so you’ll need to adjust it a little.
Render that cube with your RCT screenshot behind it. Amorphium lets me set that image as a background.
Set it accordingly and render the image.
Compare the top of your cube to the top edges of the nine square building blocks. The cube is probably
just a tiny bit wider (top to bottom) than it should be. Adjust your camera angle and render it again until they’re
as close to matching as they’re gonna get.
PERFECT! Save your 3D file IMMEDIATELY...unless you want go through that adjusting process all over
again. (Some people like to do things the hard way.)
I generally name that camera "Cam 1." Duplicate that camera and rotate it around your model 90-degrees.
This one will be named "Cam 2." (I’ll bet you can guess where I’m going with this...) Continue around the model
until you have four cameras, all pointed toward the center and all viewing the cube from the same, adjusted Isometric angle...but
from each of the four corners. This will make things easier later on...trust me.
Now you have the ability to easily view your object as the game would see it when the map rotates.
Cool, huh?
Let there be LIGHTS!
Lighting your scene is VERY important. The lighting in RCT2 ALWAYS comes from the right side. No matter
which way the map is rotated, it’s ALWAYS coming from over your right shoulder as you look at the screen. This needs
to be reflected in your 3D model as well.
Now that the cameras are adjusted, positioning the lights will be a piece of cake. They go in EXACTLY
the same positions (and angles) as the cameras. The only difference will be in naming them.
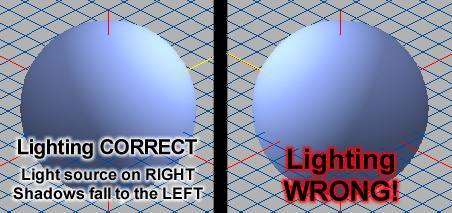
When viewing your model through Cam 1, the light immediately on your RIGHT should be used...so, name
it "Light 1." (This will save your sanity later.) Likewise, the light on Cam 2’s RIGHT should be named "Light 2." Continue
with the others until all four lights are matched up with their camera counterparts.
Isn’t that slick? Now you can adjust your camera view AND lighting by selecting the camera you
want and turning on the proper light.
We’re not completely finished, though. I use a FIFTH light on most of my models... placed directly
above dead center and pointing directly downward. It’s placed at the same distance from the model as the other four,
but NOT at full strength -- about HALF the intensity. It helps to bring out the details of the models and makes them to match
the game a bit better.
SAVE YOUR 3D FILE NOW! This will become a basic template for ALL of your RCT2 models. Maybe
save it twice...backups are always good.
If you are using Amorphium 3 (the program I use), I have made a Blank Template available
which INCLUDES all of the lights and cameras....already set up for you. The .zip file can be downloaded HERE.
Rendering Tip - Aliasing
When rendering your 3D models, make sure that "Aliasing" is turned down as low as you can get it...OFF
is even better. Aliasing makes your 3D model just the tiniest bit blurry, which is great when you’re going for photo-realism,
but we’re not.
 See, our final rendered images will be against a True Black (0,0,0) background. Because Aliasing slightly blurs the edges
of your model, you’ll end up with a black line or "halo" around your image. (TRUE Black is seen as transparent by the
game, but the edges would be just a shade off from True Black...so they don’t disappear.) Those halos have to be removed
one pixel at a time, "pixel-pushing," which we avoid like the plague. See, our final rendered images will be against a True Black (0,0,0) background. Because Aliasing slightly blurs the edges
of your model, you’ll end up with a black line or "halo" around your image. (TRUE Black is seen as transparent by the
game, but the edges would be just a shade off from True Black...so they don’t disappear.) Those halos have to be removed
one pixel at a time, "pixel-pushing," which we avoid like the plague.
Granted, your models will have "jaggies" around the edges. Such is the nature of bitmap images...especially
transparent ones. Look closely and you’ll see that ALL images in RCT2 have jaggies. Yours will fit in perfectly.
Be our Guest
FINALLY! We’re about to create Riders!
People have emailed me over the years, literally BEGGING for my Peep model. Truth is, it’s not
difficult to make one. Look at the image. Analyze it. What EXACTLY are we looking at?
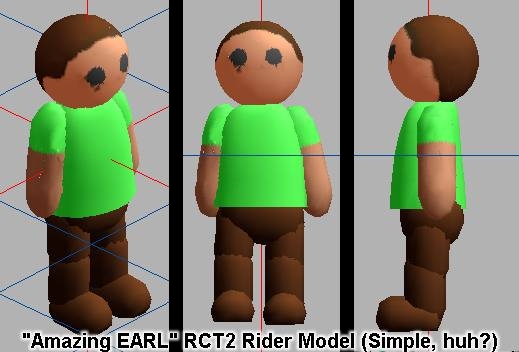
The Head - It’s a tan ball...with eyes. The back is painted brown to look like hair.
The Torso - A tapered, slightly flattened cylinder, rounded at the top, bumped out a bit at
the belly and painted green.
The Arms - A capsule (ball that’s stretched in the middle), painted tan and green
The Hips - Another, shorter capsule, painted brown
The Legs - MORE brown capsules
The Feet - Half a capsule...painted brown. Whoopie-doo.
That’s it! There were a couple of reasons I never shared my model. First, Amorphium doesn’t
"play well with others." It can export meshes/objects, but they seldom come out well in other programs. (I know that objects
from other programs don’t IMPORT well, for sure.)
The other reason is that they seemed so fascinated with the thing and were expecting something almost
"magical." And it was really just this bunch of standard objects...painted tan, green and brown. I was almost embarrassed
by it’s simplicity, really.
But the point isn’t that the Peep model must be perfect. Just the opposite, in fact. When it’s
seen in the game, it’ll only be a few pixels high. Detail will be lost completely! Save the Michaelangelo stuff for
your ride, itself.
I’ll be putting versions of my Peep model -- in different formats -- into a .zip file that will
be available for download at RCT Space with this tutorial.
Now, let’s get into the details. The model isn’t perfect, but it DOES have some features
that may not meet the eye at a casual glance.
The head is just a sphere painted tan and brown. One important thing to remember, by default RCT Rides
use True Black (0,0,0) as their transparent background. The hair is a medium/light brown so that when it is in shadow, those
shadows will NOT be truly black. If ANY part of the model shades as true black, you’ll have to recreate it pixel-by-pixel
later on. Save yourself some trouble and experiment a little to find the right shade of brown for your program(s).
The eyes are also brown. If we made them black, they’d disappear in the game. I make them the
same color as the hair for safety’s sake. Later they’ll only be ONE pixel, so it’s not a really big deal
WHAT color they are.
The skin tone is matched as closely as I could get to the color on the Guests in the game. It took
a lot of experimentation...which you can see in some of my earlier work, the "Runaway Reindeer" ride especially...the Riders
look just a little bit "Eskimo" in that one.
The pants and shoes are just the same dark brown as the hair.
The shirt? Ah...THAT color is important. It’s a TRUE Green (0,255,0)...which is the color the
game changes to match the shirt of the guest your Peep will represent on the ride. Remember we discussed that stuff back in
Chapter 2 - "How Rides Work"? Go back and re-read that if you have to...there’s no shame in it, really.
But weren’t some Rider images wearing PINK shirts? Very good! Yes, there were. That pink
is a very special shade as well. It’s close to Magenta (255,0,155), but not a TRUE Magenta (255,0,255). I’ve found
that later on, TRUE Magenta often is read by the various Bitmap Editors as a strange shade of purple. Backing off on the blue
seems to fix that just about right.
Note: These colors are approximate. I’ve tweaked them over the years and ALWAYS had to do a little
bit of pixel-pushing later...fixing problems here and there in a bitmap editor. These colors aren’t perfect, but they’ll
get you pretty close.
Remember, colors are also interpreted differently by 3D programs according to the lighting in your
scene and the properties of the material. As I said, they’re a good starting point, but you may have to adjust them
for your own set of programs.
If you are using Amorphium 3 (the program I use), I have made a copy of my Rider Model
available which INCLUDES all of the lights and cameras....already set up for you. The .zip file can be downloaded HERE.
I'm also making a .3ds version is available. It's a direct export of my Amorphium3
3D Model. I make no guarantees as to it's usability after you import it. The conversion process can do some strange
things.
You can download the .zip file HERE.
Peep Sized
Okay, now that we’ve created the Peep, we need to step back a bit...literally. As I said before,
he’ll only be a few pixels tall in the game. So we’ll zoom out on your camera so he’s really small.
How small? That’s where the screenshot you took earlier comes in to play again. Set it accordingly
and render the image.
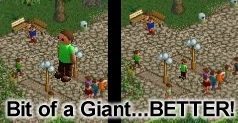
Hmmm...still looks too big. We want to get him the same size as his counterparts in the screenshot.
Zoom out a bit more...PERFECT! (Neat little trick, huh?) Adjust ALL FOUR CAMERAS to that same distance from your model and
SAVE THE TEMPLATE.
Here’s a little test...since you CAN make scenery objects in RCT2, right? That IS a prerequisite
for this tutorial, remember? Render the image of the Peep and turn it into a scenery object...and I think you should name
him Herbie!
This will also test the green or pink you’re using for the shirt. Dr. J’s Object Editor
uses exactly the same colors to make objects paintable as the game does to change the guest’s shirt color. If the color
isn’t quite right to mask easily in Dr. J’s Editor, adjust it on your 3D model.
Now, open the game and test Herbie. Stand him next to a path somewhere and compare him to the other
guests that enter the park. Does he look like he fits in with their crowd? How’s his skin tone? Too dark? Too light?
Adjust that on your 3D model and try it again.
A SLIGHT difference will not be noticeable. After all, THIS Peep will only be seen on your ride...away
from the rest of the maddening crowd. But if his skin is WAY too pink or a BIT too yellow, people will notice.
To make modeling easier, you may want to duplicate your cameras and rename them. This will allow you
to zoom in and out on your model with the new cameras, while keeping the old ones available for rendering at game size. You
DON’T want to lose those settings on the originals, right?
--Chap. 6-- |
|